I recently posted about an overly elaborate solution that I wrote to a CodeWars algorithm. That post has been lurking in the back of my head since I wrote it…
I’ve come to realize that I can’t be too hard on myself for coming up with the solution that I did. After all, the only tool I had available to me was a hammer, so I treated every problem like a nail.
An image of me writing code
My point is that up until then, any time I had to traverse an array, I had used a for loop rather than any of the methods native to the array prototype. Setting the conditions of the loop to something like (var i = 0; i < arr.length; i++) allows you to easily access and manipulate any element of the array using arr[i]. So that’s what I did…
While there’s (usually) nothing inherently wrong with that (in fact, it’s how I solved many of the algorithm challenges at Free Code Camp), loops aren’t always the most elegant solution to a problem, especially when you start to consider asynchronous options in your code. Besides, the point of this journey is to become the strongest developer I can, so let’s explore other options.
While going through the front end program at Free Code Camp, I was exposed to many of the methods in the array prototype, including forEach(), reduce(), map() and filter(). The problem was that those methods required callback functions, of which my understanding was tenuous, so I found it much easier at the time to use loops.
Working with Node.js these past few months has given me much more exposure using callback functions, so I’d like to revisit these methods and solidify my understanding of them. That way, when I encounter problems in the future, I’ll have more than one tool at my disposal.
Over the next couple weeks, I will write a post that will cover each of the four array methods mentioned above in detail. Hopefully, these posts will serve as good resources for others in my position and, at the same time, give me extra practice using each.
I’ll be sure to come back and provide links to the follow up posts once they’re written.
Since starting FCC in March I’ve made pretty steady progress through the curriculum. Of course I’d like to be moving faster, but considering all the other commitments in my life, I’m happy with my pace thus far…
That is until the past few weeks…
I was moving right along through the back end program. Learning Node and Express was going well and I got through the API projects relatively quickly…
Then I moved on to the voting app, the first of the Dynamic Web Application Projects.
I’d previously experienced so-called JavaScript Fatigue, or the overwhelming sense you get at the thought of all the frameworks, libraries and tools associated with JS.
The past few weeks, though, it’s hit me something fierce…
While thinking about how to approach the voting app I considered using a framework, maybe React or Angular 2. So I dug a little deeper…
As someone still relatively new to the JS world, comparing React and A2 isn’t exactly easy. How do I compare JSX vs TypeScript if I haven’t seen either?
Babel and Webpack. Huh?
Redux? Flux? WTF??
Bring on the JavaScript Paralysis…
I’ve spent the past couple weeks paralyzed with indecision and frustration…
When I was thinking about writing this post, I made a quick list of all the JS libraries and frameworks that I could think of. In about 2 or 3 minutes I came up with 39 of them!!
Off the top of my head!!
39!
I have the scrap of paper to prove it! No wonder JS fatigue is a real thing.
Moving on….
Look, I’m not going to go on and on here… There’s been a ton written about JavaScript fatigue lately, most of it far more eloquent than this…
I just wanted to put this out there in case anyone else in the Free Code Camp program was going through the same thing. Plus, I’m hoping this will serve as a bitch session to get it off my chest so I can move forward.
I’ve decided to say F-it and move on without a framework for the time being.
I plan on building 1 or 2 of the full stack apps without a framework, then decide between moving forward with either React or Angular 2.
At that point, I’m hoping FCC has updated their data viz section and the decision will be a little easier.
That’s it for now… Get out there and code something cool, I’m certainly going to try.
I’ve been thinking about writing a post like this for a while but have put it off because, frankly, it’s pretty embarrassing…
Today, I saw a post in the Free Code Camp Forums that made it clear, however, that I’m not the only one that goes through this. So hopefully this post will encourage other beginners to keep going, even if their code looks terrible in their own eyes…
The purpose of this post won’t be to walk through the algorithms and explain everything that’s going on, but rather to emphasize how different two answers to the same problem can be.
Codewars
Codewars, as I’ve mentioned in previous posts, is a great way to practice solving algorithm challenges. It can be pretty humbling at times, though, because after you solve the problem, you have the opportunity to look at other people’s solutions.
So, when you solve what you thought was a difficult challenge, only to see that others have solved it in one or two lines of code, it makes you wonder if you’re writing in the same language. When you realize you are, you wonder further if this coding thing is really for you…
The upside to this, and, in my opinion, the real strength of Codewars, is that you can learn from these solutions… I’ve only done a handful of algorithms on this site so far, but I’m going to show my first and last solutions as examples of how things can improve.
My First Codewars Solution
The first algorithm I solved at Codewars was called ‘Decode the Morse code’. Try not to laugh….
The site’s description of the algorithm is as follows:
JavaScript
1
2
3
4
5
6
7
8
9
10
11
12
13
14
15
16
17
18
19
20
21
22
/*
In this kata you have to write a simple Morse code decoder. While the Morse code is now mostly superceded by voice and digital data communication channels, it still has its use in some applications around the world.
The Morse code encodes every character as a sequence of "dots" and "dashes". For example, the letter A is coded as ·−, letter Q is coded as −−·−, and digit 1 is coded as ·−−−. The Morse code is case-insensitive, traditionally capital letters are used. When the message is written in Morse code, a single space is used to separate the character codes and 3 spaces are used to separate words. For example, the message HEY JUDE in Morse code is ···· · −·−− ·−−− ··− −·· ·.
NOTE: Extra spaces before or after the code have no meaning and should be ignored.
In addition to letters, digits and some punctuation, there are some special service codes, the most notorious of those is the international distress signal SOS (that was first issued by Titanic), that is coded as ···−−−···. These special codes are treated as single special characters, and usually are transmitted as separate words.
Your task is to implement a function decodeMorse(morseCode), that would take the morse code as input and return a decoded human-readable string.
For example:
decodeMorse('.... . -.-- .--- ..- -.. .')
//should return "HEY JUDE"
The Morse code table is preloaded for you as MORSE_CODE dictionary, feel free to use it. In Java, the table can be accessed like this: MorseCode.get('.--'). In C#, the preloaded Dictionary can be accessed like this: MorseCode.Get('.--');.
All the test strings would contain valid Morse code, so you may skip checking for errors and exceptions.
In C#, tests will fail if the solution code throws an exception. Please keep that in mind. (This is mostly because else the engine would simply ignore the tests, resulting in a "valid" solution.)
Good luck!
*/
So, in thinking about the solution to this algorithm, I immediately pictured various ‘for’ loops to split the Morse code into words, then letters. Then I could replace the Morse letters for real letters and reassemble the message using more ‘for’ loops.
Here is what I came up with…
JavaScript
1
2
3
4
5
6
7
8
9
10
11
12
13
14
15
16
17
18
19
20
21
22
23
24
25
26
27
decodeMorse=function(morseCode){
//accept morse code string as argument
varstr=arguments[0];
//trim leading and trailing whitespace
str=str.trim();
//create 2d array by word then letter
vararr=str.split(' ');
for(varj=0;j<arr.length;j++){
arr[j]=arr[j].split(' ');
}
//loop through array exchanging morse code for letters
for(vark=0;k<arr.length;k++){
for(vari=0;i<arr[k].length;i++){
arr[k][i]=MORSE_CODE[arr[k][i]];
}
}
//compress array into words and return
for(varl=0;l<arr.length;l++){
arr[l]=arr[l].join('');
}
returnarr.join(' ');
}
I was feeling pretty good about myself (it worked after all!) until I saw some of the top rated solutions…
Ok, so was this last attempt better?? Sure… Still room for improvement? You betcha…
Looking through past examples definitely helped me put together a more concise solution for this problem, but I still have a lot to learn…
For instance, looking at the answers to this algorithm reminded me that the array.filter() method doesn’t change the array on which it is called. So, once I filtered the non-zero values into a new array, I still had the original array to work with. I could have used it again to add the zeros to the end of the new array.
Hopefully, next time I come across a problem like this I’ll remember the more elegant solution.
In my experience, learning a new skill, especially one as difficult as programming, is all about repetition and practice. So I encourage you (and myself too) to use sites like Codewars to practice these skills over and over.
I also encourage you to take the time to look through other people’s solutions and learn from them. It’ll probably help with your approach to your next one.
It ain’t necessarily about having the shortest solution…
The second point I want to make is that the shortest solution isn’t necessarily the best solution.
We can argue that ‘for’ loops are actually faster than native functions like array.filter() and array.map(), and they are, but that argument is mostly semantic. Unless you are writing an application that demands extremely high performance, it is unlikely that the user will see a difference between the two.
I believe, therefore, that prioritization should be placed on the readability of the code you write.
Going through the process of teaching myself how to code, I’ve read many examples of code written by others, and can say for certain that all code is not created equal.
Some code is nicely written and readable… Other code is like a plate of spaghetti and impossible to decipher.
Let’s go back to the answers to the first algorithm. My code, while drawn out and overly complicated, is fairly easy to follow. The last two solutions listed, while being the shortest, are not that easy to read (at least to a newbie like me).
I’d argue that there’s gotta be a happy medium, maybe something like the one written by czyzykowski. Their solution is logical, modular and very easy to follow.
Feel free to comment below if you disagree, like I said, I’m still new to this, so maybe those last 2 examples are perfectly readable to someone who’s been at this a while.
Bottom Line
I think the takeaway from all this should be – don’t worry if your code looks like a fanewgi wrote it, just keep plugging away…
Read code others have written and keep writing more of your own. Before you know it, you’ll look back at code you wrote a while ago and realize just how far you’ve come!!
That’s it for now, I hope this helped straighten out the code…
As I mentioned in my last post, I’m interested in the ‘Internet of Things’ as a way to use and strengthen the skills I’m learning in the back end program at Free Code Camp.
So last week I ordered the SparkFun Johnny-Five Inventor’s Kit. Over the weekend, I started playing around with it, and as a bonus, my two boys (ages 9 and 12) helped out!
Keep in mind, the title of this post is ‘Getting Feet Wet…’, so nothing I’ve done so far is earth shattering, but you have to start somewhere, right?
The Kit
The kit included the Tessel 2 board and a ton of peripherals (LEDs, a breadboard, 2 motors, resistors, an LCD screen, a magnetic door switch, etc, etc). Here’s a picture of the Tessel 2 board plugged into a micro USB cable.
Tessel 2 Board
The reason I chose this kit (there are quite a few on the market) is that it came preloaded with Node.js. I figured this would be the easiest way to get started using full stack JavaScript (Node.js along with Johnny-Five).
Granted, you can download Node to the other boards on the market, but considering I was an IoT virgin, I went with the preloaded option.
It also comes with a great Experiment Guide that takes you through 14 experiments to get started. The guide also contains links to relevant tutorials so you can learn on a deeper level as you go.
The first few pages of the experiment guide explain what a development board is, what it can be used for and describes the particular features of this board. The Tessel 2, among other things, has 2 USB ports, an Ethernet port and WiFi!
It then takes you through software and hardware installation and setup.
The only software you’ll need is a text editor (I’ve been using Atom to develop my FCC projects, so continued to use it for this), Node.js and a terminal application. The guide walks you through the installation of each of these if you don’t already have them on your computer.
The hardware setup consisted of connecting the board to your computer via both USB and Wifi. You also have the chance to name your board if you want, so I named mine Lucy (after my late, great boxer)…
Lucy
At that point, you’re ready to get started with experiments!
Not counting the time I took reading the tutorials, it took less than a half hour from the time I opened the box until I was ready to run some experiments.
Time for Experiments!
The first experiment in the guide (and the first one I did with my kids) was getting an LED to blink. Exciting right? Yeah, my kids weren’t terribly impressed either…
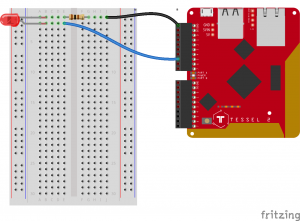
We started by building the very simple circuit outlined in the experiment guide.
As you can see from the diagram above, using the breadboard to make the connections, we made a circuit from one of the ports in Lucy (our board) to the anode (+) of the LCD, then from the cathode (-) of the LCD, through a resistor, back into the ground port of Lucy.
With the circuit complete, now we had to write the code that will make the circuit do what we want.
The Code…
This is the code the guide provides as a starting point. If you’re new to Node.js, the experiment guide does a great job of walking you through and explaining the lines of code.
JavaScript
1
2
3
4
5
6
7
8
9
10
11
varTessel=require("tessel-io");
varfive=require("johnny-five");
varboard=newfive.Board({
io:newTessel()
});
board.on("ready",()=>{
varled=newfive.Led("a5");
led.blink(500);
});
Obviously, this isn’t a complete Node tutorial, as it would take too long and I don’t have the experience (yet) to cover such a big topic, but we can walk through this code to see what it does…
One of the great things about Node is the vast number of modules that are available for use. A module is basically a block of code that does something for us. There are modules for node that handle all kinds of things.
As you can see by the top two lines of code above, we included the ‘tessel-io’ and ‘johnny-five’ modules using require() and set the modules equal to variables (Tessel and five respectively).
We can now reference those variables to have full access to the modules functionality. If you’re new to Node, that may be confusing, but keep reading for examples.
There’s actually quite a bit going on in the next block of code.
JavaScript
1
2
3
varboard=newfive.Board({
io:newTessel()
});
By writing ‘new five.Board()‘, we create an instance of a Johnny-Five Board by referencing the Johnny-Five object, Board, using the variable ‘five’ that we created in line 2.
Again, similar to what we did in the first 2 lines, we set the new Board equal to a variable, ‘board’, so we can access and manipulate it later.
io: new Tessel() is telling our program to use the Tessel() object to communicate with our board. Tessel, if you remember, is the variable we created in line 1 and set equal to require(‘tessel-io’). So, basically, we are telling our program to use the ‘tessel-io’ module to communicate with our board.
Now that we have the modules we need, and have created an instance of our board, we can actually do something with it!
The last block of code creates a listening event for our board.
JavaScript
1
2
3
4
board.on("ready",()=>{
varled=newfive.Led("a5");
led.blink(500);
});
board.on(‘ready’,callback) tells our program that when the board is ready (done initializing), run the callback function. In this case, our callback function, which is written in the new ES6 Syntax, () => {} , is contained on the 2nd 2 lines.
Again, we use ‘five’ to access the Johnny-Five module and create a new LED. We set our new LED equal to a variable, ‘led’. The ‘a5’ parameter tells our program that our new LED is connected to the A5 pin in our board.
We can then use ‘led’ to access our LED. led.Blink(500) tells the LED to blink every 500 milliseconds. Which, it did! (after we loaded and ran the program)
And the crowd goes wild!!
Well… Maybe not wild, it’s only a blinking LED after all. But that’s not the point!
We used our new coding skills to do something! Actually, that might be overstating it too, we copied the code from the experiment guide. But the point is, we completely understood the code and can now use this to build on.
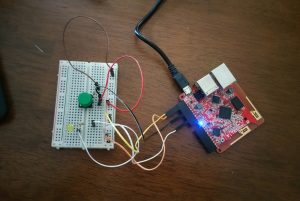
We ended up running experiment 3 too. This time we were able to control the LED with a button. You can check out the circuit and the code in the guide, but here are some pictures of our version.
The circuit used to control an LED light with a button using a Tessel 2 board.
The boys were a little more impressed with this experiment, as they could actually control something.
Tessel 2 lighting LED with Button Switch
All in all, it was a great couple hours spent with my boys, hopefully getting them excited to learn something. I definitely plan on digging deeper into what this kit can do and hope to use my newfound Node skills to design some more custom projects.
I’ll be sure to write up future adventures in IoT here at Crooked Code.
Please leave comments below if you have any suggestions for interacting with IoT or personal experiences you think might help others.
That’s it for now… Thanks for reading.
-Jeremy
In the spirit of full disclosure, the two links to the Sparkfun Kit contained in this post are Amazon (which is where I purchased it) Affiliate links, which means I would get a small (very small) percentage of your purchase if you click on the link and buy one… In the unlikely event that I see any proceeds from this, they will be used to offset part of the expense of running the Crooked Code site. Thank you.
It’s been a couple weeks since I’ve had the chance to write a post, as things have been a little crazy around the Crooked Code household…
Football season started for my two boys, they started school this week and my wife went back to work this week!! Hopefully, now things will start to settle down a bit.
Anyway, enough about that, let’s talk about what we’ve accomplished this summer and what we want to accomplish this fall….
What I’ve done this summer…
As I mentioned in a previous post, I finished the front end certificate at Free Code Camp in July!!
I decided to work on the Back End Program at FCC, then jump back and complete Data Visualization. Thus far, the back end has been difficult, but enjoyable.
It’s been difficult in that I’ve really had to change gears in my head. Node.js and working on the server side have been completely different than any other coding I’ve done in the past (granted, it’s a fairly limited past as far as coding is concerned).
Diving In…
I started the back end program by working through the Cloud9 modules for Git, Node.js, Express.js and MongoDB.
If I’m being honest, I found these modules to be pretty useless… I didn’t learn much from them, and half the time I wasn’t even sure what they were asking me to do.
As a beginner, I think it would have been more useful to have a better intro to the languages and better explanations as to what I was trying to do with them.
Instead, I felt like I was trying to satisfy the requirements of some very random modules so I could move on (and getting nothing out of it in return)…
I realize, that’s just my personal opinion and that different people learn by different methods…
Intro to the very helpful Ninja!
Speaking of actually learning, I found a very helpful tutorial series on YouTube called Node JS Tuturial for Beginners by the Net Ninja. I may have mentioned this guy before and I highly recommend these videos if your starting out learning the back end.
There are quite a few videos in the series, but each one is short and to the point and very easy to understand. I watched each of the videos and worked along side them in building a ‘To Do’ app in the last 7 or 8 videos.
In addition to a great intro into Node.js, one of the cool tangential things I learned from this series was working with Atom.
The ‘Ninja’ takes you through the steps of setting up Atom, installing Node, npm, etc. I’ve been working in Atom ever since and find it a much better environment to develop the back end projects than working on Cloud9.
Initial Thoughts on Server Side
At the risk of sounding a little naive and corny, learning how servers work has opened my eyes to the potential you have as a full stack developer.
Let me try to explain what I mean…
I feel like I learned a ton in the Front End program but I always had a nagging in the back of my head like, ‘yeah, these new skills are great, but how do I actually use this to build something bigger than a one page app??’.
Working with Node and Mongo and everything else involved in the back end program (yes, even Git) has calmed that nagging a bit and given me a sense of the bigger picture.
Granted, I’m less than a month into this and have a lot of work ahead of me, but it’s very motivating to start tying things together like this…
You can find the code for all these apps on my GitHub page. Please feel free to comment below with any suggestions or questions about my code.
Where we’re heading this fall…
First and foremost, I’ll be working towards completion of the Back End Certificate. I plan on finishing up the last two API projects then moving right on to the full stack ‘Dynamic Web Application Projects’.
Additional Resources
In addition to the Free Code Camp projects, I’ve continued listening to tech related podcasts. I mentioned most of the ones I’m listening to in a previous post, but have picked up a few new ones as well.
The Elections Podcast is by the awesome people at FiveThirtyEight.com where they talk about how they are applying their models in an attempt to predict the outcome of this year’s US presidential elections. It’s very relevant and very cool…
Internet of things
As I’ve been working through the back end program at FCC, I’ve been trying to think of ways to start applying what I’m learning in the real world.
One idea that I’ve been giving a lot of thought to lately is the internet of things (hence the IoT Podcast).
The internet of things, if you don’t already know, is a broad term that describes all the real word items (refrigerators, cars, wearables, thermostats, etc, etc, etc) that are hooked up to the internet and can be sensed and/or controlled remotely, the so called ‘smart’ items.
Just yesterday I ordered a beginners kit that includes a board and a bunch of sensors and motors so I can start playing around with this stuff. I’m really excited about it and one of my sons wants to get involved too, which makes it even better!
Johnny-Five!
Considering the FCC program is full stack JavaScript, I’m planning on using the JavaScript framework called Johnny-Five which enables you to run full stack JavaScript, including Node, to control the robotics. I’ll be sure to include my experiences here at Crooked Code.
A friend of mine, Serg Chernata, just started a blog called ‘Bits & Pieces‘, where he’s going to discuss a bunch of tech related topics, including his experiences with IoT. In fact, his first post was about setting up a Raspberry Pi as a home server to host his blog.
I’ve included a link to his blog on the sidebar of this site under ‘Recommended Blogs’. I’ll keep adding to this list as I come across sites that I find interesting and useful.
Once again I’ve written a much longer post than originally planned, which is not easy for someone who says so little in the real world! Hopefully, if you’re still reading, you got something out of this.
Let’s tackle another Free Code Camp advanced algorithm – ‘Symmetric Difference’. The challenge here is to ‘create a function that takes two or more arrays and returns an array of the symmetric difference (△ or ⊕) of the provided arrays.’
The symmetric difference of two sets of elements is the set that occurs in either one of the two sets, but not both (i.e. the symmetric difference of [1,2,3,4] and [3,4,5,6] is [1,2,5,6]). For more reading on symmetric difference, check out this wiki page.
Free Code camp gives us the following as a starting point:
JavaScript
1
2
3
4
5
functionsym(args){
returnargs;
}
sym([1,2,3],[5,2,1,4]);
This is another case where we have to write a function for which we need to handle an unknown number of arguments. To accomplish this, we’ll be using the arguments object. I’ve covered the arguments object in a previous post, ‘Seek and Destroy’. If you are unfamiliar with or would like a refresher of the arguments object, please check it out.
One of the helpful hints FCC provides us with is a link to the Array.prototype.reduce() method. The arr.reduce method is a great way to cycle through and apply a function to each element of an array.
The arr.reduce method takes 2 arguments, a callback function (which will be applied to each element of the array) and an initial value (the element to provide as the first argument to the first callback function call – see here for more).
If you’re new to JavaScript, or somewhat unclear of what a callback function is, JavaScriptIsSexy.com has an excellent post on callbacks.
The callback takes a possibility of 4 arguments – previousValue, currentValue, currentIndex and array. This is important, as it means when we write our callback function, we will have access to these 4 values within the function (for further clarity on exactly what the four values are, check out the MDN link mentioned previously).
I think we should break down this challenge into two main problems. We need to:
Write a function that returns an array of the symmetric difference (⊕) between two given arrays
Use this function to handle an unknown number of arguments. For example:
find (arg1 ⊕ arg2)
if there’s an agr3, find arg3 ⊕ (arg1 ⊕ arg2)
continue for argX
At this point, I’m going to start discussing my solution to the problem. If you’re working through FCC, I’d suggest attempting a solution on your own given what we’ve discussed above. Otherwise, proceed on…
Let’s start by writing the function we’ll use to calculate the symmetric difference between two arrays.
In other words, we need to write a function that receives two arrays as arguments, then returns an array of the numbers that are in one of the argument arrays, but not both.
One way to do this is to
create a new empty array (curDiff) to store the symmetric diff
use arr.reduce() to cycle through each array (need to compare each array against the other, not just one against the other)
in the callback function of arr.reduce
check if an element is in the other array or in the curDiff array (to prevent duplicates in curDiff)
if not – push element to curDiff
hint – arr.indexOf() will return -1 if the given element is not found
We now have a function (findSymDiff()) that we can use within our main function to get the symmetric difference between two arrays. We now have to set up the logic to handle an unknown number of parameters received by our main function.
Our logic (using the arguments object) can look something like this:
create new array (symDiff) to store the array returned by findSymDiff()
compare arguments[0] to arguments[1] using findSymDiff()
cycle through argument[]
compare symDiff to arguments[x]
To accomplish this, we can set up a simple for loop.
If we set
JavaScript
1
symDiff=arguments[0];
we can call
JavaScript
1
symDiff=findSymDiff(symDiff,arguments[i]);
in our for loop starting at i=1 and loop while i<arguments.length.
Then all we have to do is return symDiff!
Here’s how everything looks when we put it together:
JavaScript
1
2
3
4
5
6
7
8
9
10
11
12
13
14
15
16
17
18
19
20
21
22
23
24
25
26
27
28
29
30
31
functionsym(args){
//function to find symmetric difference between 2 arrays
functionfindSymDiff(a,b){
//array to hold diffence
varcurDiff=[];
//check 1st array against 2nd and currentDiff (to prevent duplicates from same array)
//set first arg equal to symDiff to make 1st call easier
varsymDiff=arguments[0];
//loop through all arguments
for(vari=1;i<arguments.length;i++){
symDiff=findSymDiff(symDiff,arguments[i]);
}
returnsymDiff;
}
This solution passes all of the FCC test cases.
Thanks for reading, feel free to leave comments or additional solutions below. And if you’re working through Free Code Camp, hopefully this helped straighten out the code.
This post will cover freeCodeCamp’s intermediate algorithm scripting challenge ‘Boo who’.
‘Boo who’ challenges us to write a function that checks if a given argument is classified as a boolean primitive. If so, return true, if it’s anything else, return false.
The solution, once written, is quite simple but there are a few key concepts we have to understand before we can get there.
Here’s what FCC gives us as a starting point:
JavaScript
1
2
3
4
5
6
functionbooWho(bool){
// What is the new fad diet for ghost developers? The Boolean.
returnbool;
}
booWho(null);
Now, we have to figure out… What the hell is a boolean primitive?
First, let’s consider what boolean means? Boolean is a word used in both math and computer science. In computer science, it generally refers to a data type or a variable that can have only one of two values, usually true or false.
Boolean variables are useful in controlling the logic of an algorithm and are generally used in conditional statements such:
JavaScript
1
2
3
4
5
if(bool){
//if bool is true, do something
}else{
//if bool is false, do something else
}
Second, what does primitive mean? Mozilla, as always, gives a pretty good description of a primitive. Basically, Mozilla tells us a primitive value ‘is data that is not an object and has no methods.’
Tangent on Primitive Types vs. Reference Type
According to the latest ECMAScript standard, JavaScript has 7 data types. 6 primitive types which are string, number, boolean, null, undefined and symbol and one reference type – object.
The difference between the two types becomes confusing when you consider that JavaScript provides constructor functions that allow you to wrap boolean, number and string values as objects, which changes them from primitive to reference type.
Consider the following:
JavaScript
1
2
3
4
5
6
7
varstr=newString('hello world');
//'hello world' is a primitive string value
//str is now a string object
typeofstr;//'object'
typeof'hello world';//'string'
Problems start to arise if you try to use a string object like a string primitive. Keep in mind that a string object is still an object, and behaves like one.
For instance:
JavaScript
1
2
3
4
5
6
7
8
9
10
11
12
13
varstr1='primitive string';
varstr2='primitive string';
str1===str2;//true
//however
varobj1=newString('object string');
varobj2=newString('object string');
obj1===obj2;//false
//string objects are two completely different objects and will only equal themselves
Given that JavaScript will allow you to use the methods associated with an object prototype on the primitive values (example below), it is best to use primitive types whenever possible.
JavaScript
1
2
3
//example of a string prototype object method used on a string primitive
'hello world'.toUpperCase();//'HELLO WORLD'
FYI, Effective JavaScript by David Herman has a good section on why primitive types should be preferred to using object wrappers and I derived some of my examples above from those found in his book.
Ok, enough about Primitive Types, hopefully this has been more than enough info to solve ‘Boo who’.
End of Tangent
Check out the Mozilla link above for further explanation of primitive values (or this one for info on the Boolean object), but for our purposes in solving ‘Boo who’ we now know that the only boolean primitives are true and false.
So, now we have to fill in the booWho function above, checking if bool equals true or false. In doing so, we’ll use the strict equality operator (===) vs. the loose equality operator (==), as the latter will convert the two values to a common type before checking equality, which is not what we want.
At this point, we’ve gone over all the tools you’ll need to write the booWho function, so if you’re working through the freeCodeCamp curriculum you may want to go try to solve it on your own, otherwise, read on…
Here’s the solution to ‘Boo who’ that I came up with:
JavaScript
1
2
3
4
5
6
functionbooWho(bool){
if(bool===true||bool===false){
returntrue;
}
returnfalse;
}
As you probably know, || is the logical operator ‘or’ in JavaScript, so this function will return true if bool equals true or false.
The freeCodeCamp wiki provides an even shorter solution using the ‘typeof’ operator, written by Rafase282.
JavaScript
1
2
3
functionbooWho(bool){
returntypeofbool==='boolean';
}
Both solutions solve the ‘Boo who’ algorithm challenge and pass all the test cases at freeCodeCamp.
That’s it for now, hopefully this helped straighten out the code…