As I mentioned in my last post, I’m interested in the ‘Internet of Things’ as a way to use and strengthen the skills I’m learning in the back end program at Free Code Camp.
So last week I ordered the SparkFun Johnny-Five Inventor’s Kit. Over the weekend, I started playing around with it, and as a bonus, my two boys (ages 9 and 12) helped out!
Keep in mind, the title of this post is ‘Getting Feet Wet…’, so nothing I’ve done so far is earth shattering, but you have to start somewhere, right?
The Kit
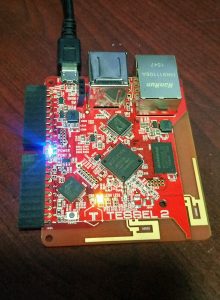
The kit included the Tessel 2 board and a ton of peripherals (LEDs, a breadboard, 2 motors, resistors, an LCD screen, a magnetic door switch, etc, etc). Here’s a picture of the Tessel 2 board plugged into a micro USB cable.
The reason I chose this kit (there are quite a few on the market) is that it came preloaded with Node.js. I figured this would be the easiest way to get started using full stack JavaScript (Node.js along with Johnny-Five).
Granted, you can download Node to the other boards on the market, but considering I was an IoT virgin, I went with the preloaded option.
It also comes with a great Experiment Guide that takes you through 14 experiments to get started. The guide also contains links to relevant tutorials so you can learn on a deeper level as you go.
I started by reading a few tutorials like ‘What is a circuit?‘, ‘Voltage, current, resistance and Ohm’s Law‘ and ‘How to use a breadboard‘ to freshen up my knowledge of circuits and electronics. The experiment guide turned out to be an awesome resource in helping to get started.
Getting Started with the Tessel 2 Board
The first few pages of the experiment guide explain what a development board is, what it can be used for and describes the particular features of this board. The Tessel 2, among other things, has 2 USB ports, an Ethernet port and WiFi!
It then takes you through software and hardware installation and setup.
The only software you’ll need is a text editor (I’ve been using Atom to develop my FCC projects, so continued to use it for this), Node.js and a terminal application. The guide walks you through the installation of each of these if you don’t already have them on your computer.
The hardware setup consisted of connecting the board to your computer via both USB and Wifi. You also have the chance to name your board if you want, so I named mine Lucy (after my late, great boxer)…

At that point, you’re ready to get started with experiments!
Not counting the time I took reading the tutorials, it took less than a half hour from the time I opened the box until I was ready to run some experiments.
Time for Experiments!
The first experiment in the guide (and the first one I did with my kids) was getting an LED to blink. Exciting right? Yeah, my kids weren’t terribly impressed either…
We started by building the very simple circuit outlined in the experiment guide.
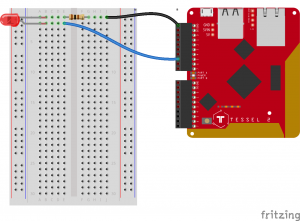
As you can see from the diagram above, using the breadboard to make the connections, we made a circuit from one of the ports in Lucy (our board) to the anode (+) of the LCD, then from the cathode (-) of the LCD, through a resistor, back into the ground port of Lucy.
With the circuit complete, now we had to write the code that will make the circuit do what we want.
The Code…
This is the code the guide provides as a starting point. If you’re new to Node.js, the experiment guide does a great job of walking you through and explaining the lines of code.
|
1 2 3 4 5 6 7 8 9 10 11 |
var Tessel = require("tessel-io"); var five = require("johnny-five"); var board = new five.Board({ io: new Tessel() }); board.on("ready", () => { var led = new five.Led("a5"); led.blink(500); }); |
Obviously, this isn’t a complete Node tutorial, as it would take too long and I don’t have the experience (yet) to cover such a big topic, but we can walk through this code to see what it does…
One of the great things about Node is the vast number of modules that are available for use. A module is basically a block of code that does something for us. There are modules for node that handle all kinds of things.
As you can see by the top two lines of code above, we included the ‘tessel-io’ and ‘johnny-five’ modules using require() and set the modules equal to variables (Tessel and five respectively).
We can now reference those variables to have full access to the modules functionality. If you’re new to Node, that may be confusing, but keep reading for examples.
There’s actually quite a bit going on in the next block of code.
|
1 2 3 |
var board = new five.Board({ io: new Tessel() }); |
By writing ‘new five.Board()‘, we create an instance of a Johnny-Five Board by referencing the Johnny-Five object, Board, using the variable ‘five’ that we created in line 2.
Again, similar to what we did in the first 2 lines, we set the new Board equal to a variable, ‘board’, so we can access and manipulate it later.
io: new Tessel() is telling our program to use the Tessel() object to communicate with our board. Tessel, if you remember, is the variable we created in line 1 and set equal to require(‘tessel-io’). So, basically, we are telling our program to use the ‘tessel-io’ module to communicate with our board.
Now that we have the modules we need, and have created an instance of our board, we can actually do something with it!
The last block of code creates a listening event for our board.
|
1 2 3 4 |
board.on("ready", () => { var led = new five.Led("a5"); led.blink(500); }); |
board.on(‘ready’, callback) tells our program that when the board is ready (done initializing), run the callback function. In this case, our callback function, which is written in the new ES6 Syntax, () => {} , is contained on the 2nd 2 lines.
Again, we use ‘five’ to access the Johnny-Five module and create a new LED. We set our new LED equal to a variable, ‘led’. The ‘a5’ parameter tells our program that our new LED is connected to the A5 pin in our board.
We can then use ‘led’ to access our LED. led.Blink(500) tells the LED to blink every 500 milliseconds. Which, it did! (after we loaded and ran the program)
And the crowd goes wild!!
Well… Maybe not wild, it’s only a blinking LED after all. But that’s not the point!
We used our new coding skills to do something! Actually, that might be overstating it too, we copied the code from the experiment guide. But the point is, we completely understood the code and can now use this to build on.
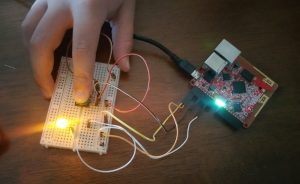
We ended up running experiment 3 too. This time we were able to control the LED with a button. You can check out the circuit and the code in the guide, but here are some pictures of our version.
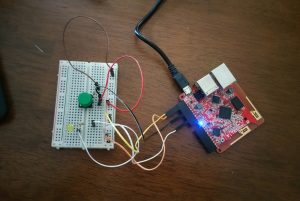
The boys were a little more impressed with this experiment, as they could actually control something.
All in all, it was a great couple hours spent with my boys, hopefully getting them excited to learn something. I definitely plan on digging deeper into what this kit can do and hope to use my newfound Node skills to design some more custom projects.
I’ll be sure to write up future adventures in IoT here at Crooked Code.
Please leave comments below if you have any suggestions for interacting with IoT or personal experiences you think might help others.
That’s it for now… Thanks for reading.
-Jeremy
In the spirit of full disclosure, the two links to the Sparkfun Kit contained in this post are Amazon (which is where I purchased it) Affiliate links, which means I would get a small (very small) percentage of your purchase if you click on the link and buy one… In the unlikely event that I see any proceeds from this, they will be used to offset part of the expense of running the Crooked Code site. Thank you.